 |
| Matrix Display |
LED dot matrices are very popular and it can displaying information such as both static and animated text and images. you can see it at gas stations displaying the gas prices, or in the public places and alongside highways, displaying advertisements on large dot matrix panels. In this project, we can use LED dot matrix interface with a micro-controller to display static characters and symbols.
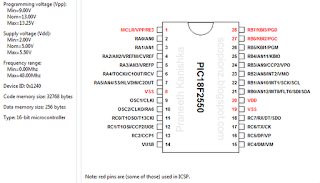
This circuit of a Dot Matrix is based on the PIC18F2550 micro-controller and software is pic basic pro and it also include Proteus ISIS simulation and Kicad PCB files.
 |
| Circuit Board |
This circuit has 8 of 8×8 matrices and currently I used only 3 matrices.but you can use up to 8 matrices. I added two different hardware versions in download. but firmware is same. In my circuit I used CD4541 PCB and bypass the transistors. But brightness of your displays are very low or you need extra brightness then used transistors. and remember to add heat sink to regulator ic.
Character Set
The most difficult thing about using the dot matrix LED display is defining the characters. Basically for ASCII characters you need an array of 128 blocks each having 8 column data numbers.The usual way is to get out a piece of graph paper and define your characters by drawing blocks where a pixel is on. You then translate each line into hex (binary to hex is very easy) and then transfer this information to your program source code.
Theory of LED Dot Matrix Display
In a dot matrix display, multiple LED s are wired together in rows and columns. This is done to minimize the number of pins required to drive them. For example, a 8×8 matrix of LED s would need 64 I/O pins, one for each LED pixel. By wiring all the anodes together in rows , and cathodes in columns, the required number of I/O pins is reduced to 16. Each LED is addressed by its row and column number.Characters can be displayed by fast scanning of either rows or columns.
Video Of Matrix Display
How to compile?
First install MicroCode StudioThen install PICBASIC PRO Compiler
Finally install MPLAB IDE
Now open MicroCode Studio
Click View >> Compile and Program Option >> Compiler >> Find Automatically
Else you can manually search your pbp folder (Default C:\pbp)
Next Click Assembler >> Find Automatically
Or you can manually search by clicking Find Manually button (Default C:\Program Files\Microchip\MPASM Suite)
Then open 18F2550.bas with MicroCode Studio, choose 18F2550 and press F9 or go to project >> compile
Now you were done.
PIC18F2550 Datasheet
 |
| pin connection |
Posted By :


Please Note: All contents provided on this blog are for non-commercial purposes only.


Post a Comment