Recently I need a rotary encoder circuit for my amplifier. So I searched the internet and test some circuits and codings I found. But nothing work for me. Some are worked but not accurate. So i decided to build my own.
A rotary encoder is a special type of switch that converts the motion of the switch (clockwise or counterclockwise) into an output signal that can be used to determine what direction the knob is being rotated. There are many different types of rotary encoders which use different technologies and construction materials, however, today we’ll be looking specifically at quadrature rotary encoders which are the most common for general electronics. They're used in many applications such as the manual volume control or tuning on a car stereo.
A quadrature rotary encoder is similar to a potentiometer, however, a rotary encoder doesn’t have limiting points in the rotation; it will rotate infinitely in either direction. Quadrature rotary encoders don’t output an absolute, fixed position, but rather have a number of increments per 360 degrees, and each increment consists of digital pulses known as ‘grey code’. Most encoders have detents which give tactile feedback every time they increment, however, you can also get smooth encoders without detents, usually with a higher number of steps per rotation.
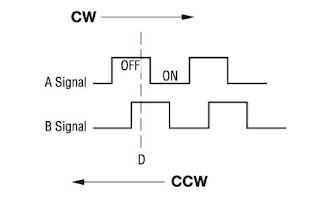
It has three pins: A, C, and B. C is the common ground for A and B. A and B are the signal pins. When you rotate the knob, A and B come into contact with the common ground pin, in a particular order depending on the direction you are rotating the knob. When each pin comes into contact with the common ground, they produce a signal. These signals are shifted out of phase with each other as one pin connects before the other pin. This is called quadrature encoding. You need to listen to those pins and the way they pulse in order to determine the direction and number of steps.
/**************************************************************************
Rotary Encoder
Copyright (C) 2019 Scorpionz
This program is free software: you can redistribute it and/or modify
it under the terms of the GNU General Public License as published by
the Free Software Foundation, either version 3 of the License, or
(at your option) any later version.
This program is distributed in the hope that it will be useful,
but WITHOUT ANY WARRANTY; without even the implied warranty of
MERCHANTABILITY or FITNESS FOR A PARTICULAR PURPOSE. See the
GNU General Public License for more details.
You should have received a copy of the GNU General Public License
along with this program.
>> Email: scorpionzblog@gmail.com
>> Blog : scopionz.blogspot.com
***************************************************************************/
#define SW GPIO.F1
void Interrupt()
{
INTCON.GIE = 0; //Disable Global Interupt
if(INTCON.INTF) //RB0/INT External Interrupt Flag bit is set
{
if(SW) GPIO.F4=1;
else GPIO.F5=1;
GPIO.F0=1;
delay_ms(100);
GPIO = 0;
}
INTCON.INTF = 0; //Clear RB0/INT External Interrupt Flag bit
INTCON.GIE = 1; //Enable Global Interrupt
}
void main()
{
OSCCON = 0x75;
ADCON0 = 0x00;
CMCON0 = 0x07; // Disable Comparators
CMCON1 = 0x00;
ANSEL = 0x00;
INTCON.GIE = 1; // Global Interrupt Enable
INTCON.INTE = 1; // RB0/INT External Interrupt Enable bit
OPTION_REG = 0b00111111; // wpu & int fall
TRISIO = 0b00000110;
WPU = 0b00000010;
GPIO = 0b00000001;
delay_ms(500);
GPIO = 0;
}
What Is Rotary Encoder
 |
| Typical Rotary Encoder |
A quadrature rotary encoder is similar to a potentiometer, however, a rotary encoder doesn’t have limiting points in the rotation; it will rotate infinitely in either direction. Quadrature rotary encoders don’t output an absolute, fixed position, but rather have a number of increments per 360 degrees, and each increment consists of digital pulses known as ‘grey code’. Most encoders have detents which give tactile feedback every time they increment, however, you can also get smooth encoders without detents, usually with a higher number of steps per rotation.
How do They Work?
 |
| Quadrature Output Table |
The Circuit
In my circuit I used PIC12F683 microcontroller. It configured to run using its internal oscillater at 8Mhz and internal pull up enable for GP1. And used few components. 0.47uf capacitor used to avoid noices making by rotary encoder. GP0 indicate rotation and GP4 and 5 indicate direction. |
| Rotary Encoder Circuit |
The Coding
The code was written by using Mikroc Pro for pic.Rotary Encoder
Copyright (C) 2019 Scorpionz
This program is free software: you can redistribute it and/or modify
it under the terms of the GNU General Public License as published by
the Free Software Foundation, either version 3 of the License, or
(at your option) any later version.
This program is distributed in the hope that it will be useful,
but WITHOUT ANY WARRANTY; without even the implied warranty of
MERCHANTABILITY or FITNESS FOR A PARTICULAR PURPOSE. See the
GNU General Public License for more details.
You should have received a copy of the GNU General Public License
along with this program.
>> Email: scorpionzblog@gmail.com
>> Blog : scopionz.blogspot.com
***************************************************************************/
#define SW GPIO.F1
void Interrupt()
{
INTCON.GIE = 0; //Disable Global Interupt
if(INTCON.INTF) //RB0/INT External Interrupt Flag bit is set
{
if(SW) GPIO.F4=1;
else GPIO.F5=1;
GPIO.F0=1;
delay_ms(100);
GPIO = 0;
}
INTCON.INTF = 0; //Clear RB0/INT External Interrupt Flag bit
INTCON.GIE = 1; //Enable Global Interrupt
}
void main()
{
OSCCON = 0x75;
ADCON0 = 0x00;
CMCON0 = 0x07; // Disable Comparators
CMCON1 = 0x00;
ANSEL = 0x00;
INTCON.GIE = 1; // Global Interrupt Enable
INTCON.INTE = 1; // RB0/INT External Interrupt Enable bit
OPTION_REG = 0b00111111; // wpu & int fall
TRISIO = 0b00000110;
WPU = 0b00000010;
GPIO = 0b00000001;
delay_ms(500);
GPIO = 0;
}


